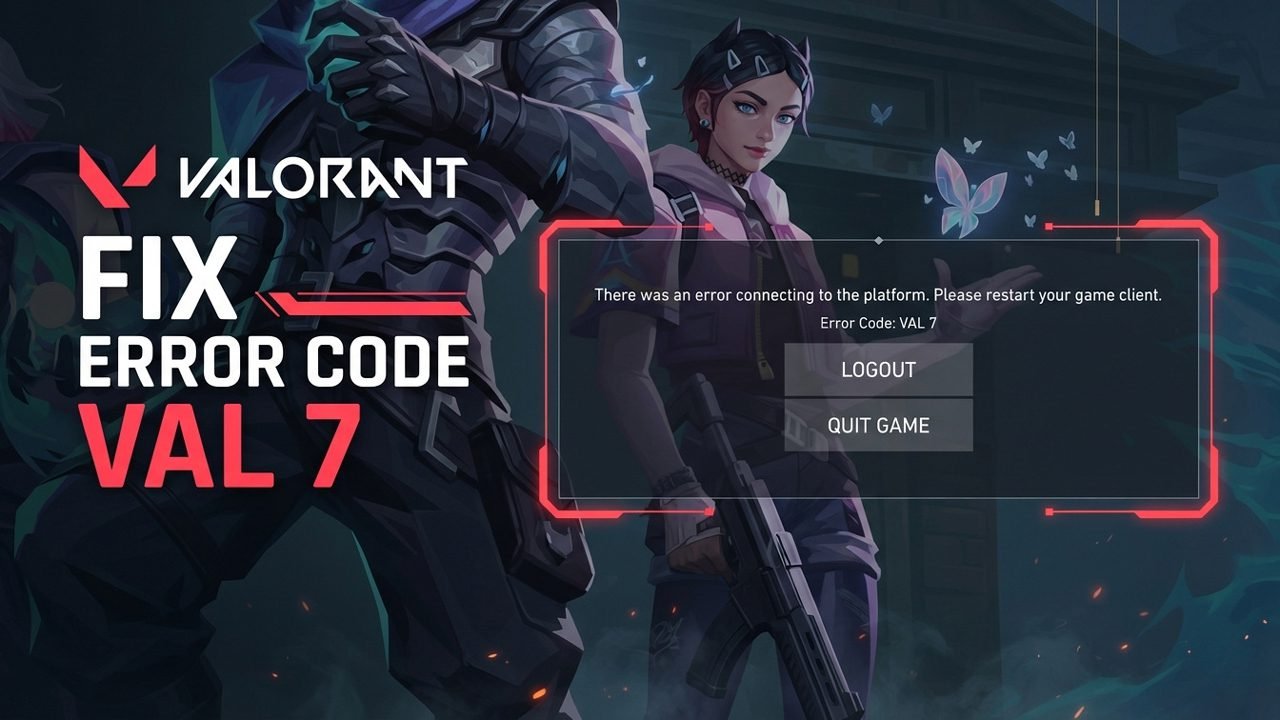
Running into the “There was an error connecting to the platform” (Error Code VAL 7) message when launching Valorant can be frustrating, especially when you are ready to jump into a match.
This error typically occurs when the Riot Client fails to establish a secure, verified session with Riot’s authentication servers due to a system clock or region mismatch, an account restriction, a blocked Riot Vanguard service, or a temporary network conflict.
Fortunately, Riot Games officially confirmed in November 2026 that setting your Windows clock to sync automatically resolves VAL 7 in most cases. In this guide, we will walk you through that primary solution first, followed by every other proven troubleshooting step, ordered from quickest checks to deeper system and network fixes – to get you back in the game safely.
What Causes Valorant Error Code VAL 7?
Error Code VAL 7 (“There was an error connecting to the platform”) appears when the Riot Client is blocked from establishing a verified login session with Riot’s servers. The most common triggers include:
- Out-of-Sync System Clock or Region Mismatch: Riot’s authentication servers use strict SSL security certificates. If your Windows date, time, time zone, or country setting is inaccurate, the server rejects your connection.
- Riot Vanguard (
vgc) Service Interruptions: If Riot’s anti-cheat background service fails to start with Windows or has corrupted files, Valorant cannot authenticate your session. - Windows 11 Core Isolation Conflicts: Recent Vanguard updates rely on hardware-level security features like Memory Integrity, which can trigger platform errors if disabled.
- Network, DNS, or Firewall Blocks: Corrupted DNS cache, unstable Wi-Fi, restrictive ISP routing, or Windows Firewall rules can block the Riot Client from reaching login servers.
- Server Outages or Account Restrictions: Scheduled maintenance on Riot’s end or an active suspension on your Riot ID will also prevent session connections.
How to Fix Valorant Error Code VAL 7
Follow the troubleshooting steps below in order, starting with Riot’s official clock-sync solution and moving to deeper network and Vanguard fixes.
Test launching Valorant after each method until the connection error disappears.
Fix 1. Sync Your Windows Date, Time, and Region Automatically
Riot’s authentication servers rely on strict security certificates to verify your login session. If your PC’s system clock is even a few seconds out of sync, or your Windows region is misconfigured, the connection is rejected with Error Code VAL 7.
- Close Valorant and the Riot Client completely.
- Right-click the date and time display in the bottom-right corner of your Windows taskbar and select Adjust date and time.
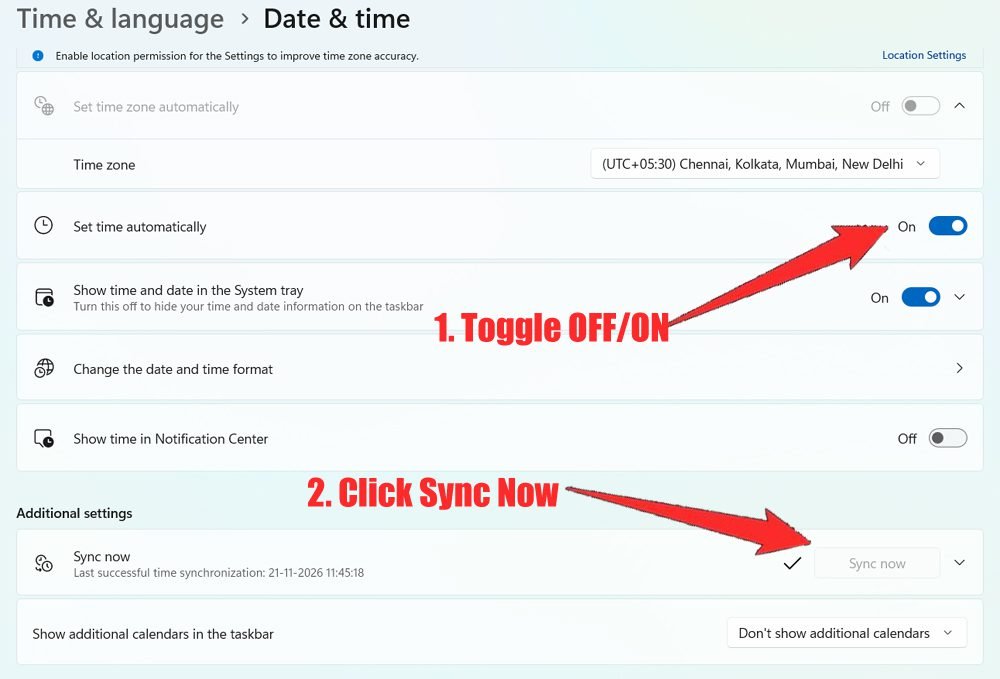
- Toggle Set time automatically to On (if it is already on, toggle it Off and back On to refresh it).
- Toggle Set time zone automatically to On (or manually select your exact time zone from the dropdown menu).
- Scroll down to Additional settings and click the Sync now button under Sync your clock. (Tip: If you see a red error message, click Sync now a few times until a checkmark appears.)
- Next, go to Settings > Time & language > Language & region and confirm that your actual Country or region is selected.
- Launch the Riot Client and test Valorant.
Fix 2. Check Riot Games Server Status
Before making deeper system changes, confirm that the issue is on your end rather than a scheduled maintenance window or regional server outage.
- Visit the official Riot Games Service Status page.
- Select Valorant and choose your region from the dropdown menu.
- Check for any active warning banners regarding login issues or platform maintenance. If an outage is listed, wait until Riot resolves it on their end.
3. Check Your Email for Account Suspensions
According to Riot’s official VALORANT Error Codes Guide, Error Code VAL 7 means the client could not connect to the session service, which can also be triggered by an active account restriction.
- Open the email inbox linked to your Riot Games account (and check your Spam or Promotions folders).
- Search for recent messages from Riot Games regarding a suspension, penalty, or security lock.
- Alternatively, log in to your Riot Games Account Management page to verify your account standing. If your account is suspended, you will need to wait out the restriction or submit an appeal.
Fix 4. Sign Out of All Devices and Re-Login
A corrupted or expired login token cached in the Riot Client can block new platform sessions.
- Open the Riot Client and click your Profile icon in the top-right corner.
- Click Sign Out (make sure to uncheck Stay signed in on the login screen).
- Close the Riot Client completely, including from the Windows System Tray (the small upward arrow near your Windows clock).
- Reopen the Riot Client, enter your credentials, and launch Valorant.
Fix 5. Run Riot Client and Valorant as Administrator
Restricted folder permissions can sometimes prevent the client from updating session tokens properly.
- Right-click the Riot Client (or Valorant) shortcut on your desktop and select Properties.
- Switch to the Compatibility tab.
- Check the box next to Run this program as an administrator.
- Click Apply and OK, then launch the client.
Fix 6. Switch to a Wired Ethernet Connection or Test a Mobile Hotspot
Packet loss over Wi-Fi or temporary ISP routing blocks can interrupt the platform handshake. Testing an alternate connection quickly isolates network issues.
- If you are on Wi-Fi, connect your PC directly to your router using a wired Ethernet cable and test the game.
- Alternatively, enable Personal Hotspot on your smartphone, connect your PC to your phone’s mobile data network, and launch Valorant.
- If the game connects on your mobile hotspot, restart your home router for 60 seconds to clear ISP routing hiccups.
7. Use Cloudflare WARP (1.1.1.1) or Check Your VPN
If your ISP is blocking or throttling Riot’s authentication ports, routing your traffic through Cloudflare’s secure network often resolves VAL 7 immediately. (Note: If you already have a standard third-party VPN or proxy active, turn it off first, as certain VPN servers are blocked by Riot.)
- Visit the official Cloudflare WARP Windows Setup page and download the desktop client.
- Install and open the app, click the gear icon, and ensure 1.1.1.1 with WARP (Traffic and DNS) mode is selected.
- Toggle the main switch to Connected and minimize the window to your system tray.
- Right-click the Riot Client, select Run as administrator, and launch Valorant.
Fix 8. Switch to a Public DNS (Google or Cloudflare)
If you prefer not to install extra software, manually changing your Windows DNS settings can achieve a similar routing fix.
- Open Windows Settings (
Windows Key + I) and go to Network & internet. - Click on your active connection (Wi-Fi or Ethernet) and select Hardware properties.
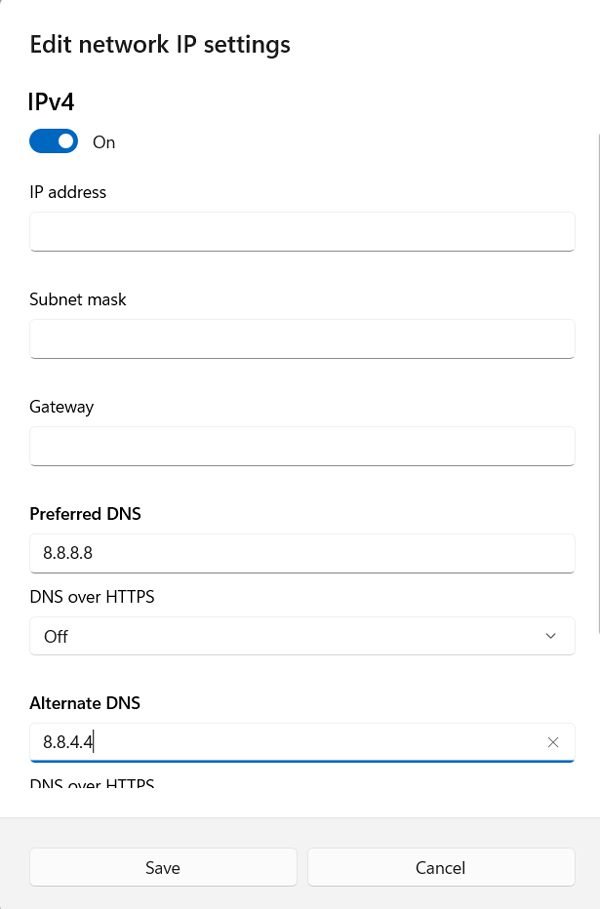
- Next to DNS server assignment, click Edit.
- Change the setting from Automatic (DHCP) to Manual, and toggle IPv4 to On.
- Enter either Google DNS or Cloudflare DNS:
- Google DNS: Preferred:
8.8.8.8| Alternate:8.8.4.4 - Cloudflare DNS: Preferred:
1.1.1.1| Alternate:1.0.0.1
- Google DNS: Preferred:
- Click Save, restart the Riot Client, and launch the game.
Fix 9. Flush Your DNS and Perform a Windows Network Reset
Corrupted local DNS cache or broken network adapters can prevent the Riot Client from reaching login servers.
- Click the Start menu, type
cmd, right-click Command Prompt, and select Run as administrator. - Run these commands one by one, pressing Enter after each:
ipconfig /flushdnsipconfig /releaseipconfig /renewnetsh winsock reset
- If the error persists, open Windows Settings > Network & internet > Advanced network settings > Network reset, click Reset now, and confirm.
- Restart your PC, reconnect to your network, and test Valorant.
Fix 10. Allow Valorant and Vanguard Through Windows Firewall
Overly strict firewall rules or third-party antivirus software can silently block the authentication handshake between your PC and Riot’s servers.
- Press the Windows Key, type Allow an app through Windows Firewall, and press Enter.
- Click the Change settings button in the top-right corner.
- Scroll down and ensure both Private and Public boxes are checked for:
- VALORANT (
VALORANT-Win64-Shipping.exe) - Riot Client (
RiotClientServices.exe) - vgc (Riot Vanguard)
- VALORANT (
- If any of them are missing, click Allow another app…, browse to your
C:\Riot Gamesfolder, and add them manually. - Click OK to save your changes.
Fix 11. Restart the Riot Vanguard Service (vgc)
Riot Vanguard is Valorant’s anti-cheat system. If its background service fails to initialize properly when Windows boots, the game cannot connect to the platform.
- Press Windows Key + R on your keyboard to open the Run dialog box.
- Type
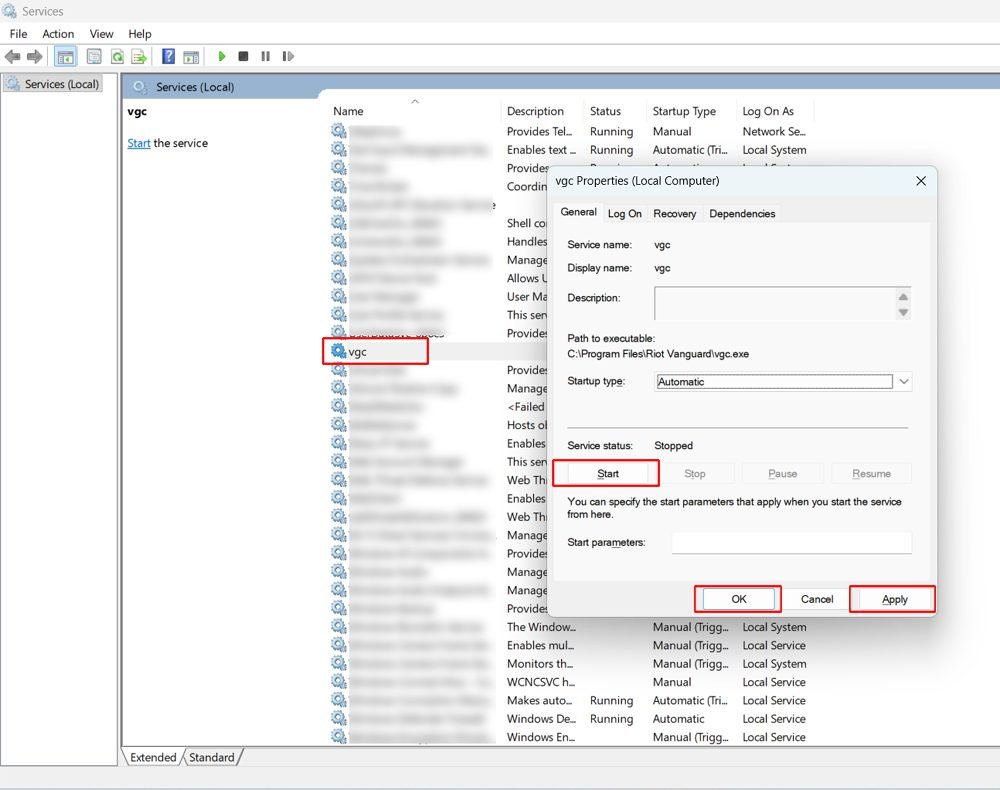
services.mscand press Enter. - Scroll down the list of services and locate vgc.
- Right-click vgc and select Properties.
- Change the Startup type dropdown to Automatic, then click Apply.
- Under Service status, click Start (or click Stop and then Start if it is already running).
- Click OK, restart your PC, and relaunch Valorant.
Fix 12. Enable Core Isolation (Memory Integrity) on Windows 11
Recent updates to Riot Vanguard require certain hardware-level security features to be active on Windows 11. Several players have resolved persistent VAL 7 errors by enabling Memory Integrity.
- Click the Start menu, type Core isolation, and press Enter.
- Locate the Memory integrity toggle and switch it to On.
- If Windows prompts you to resolve any incompatible drivers, follow the on-screen instructions.
- Restart your computer for the security change to take effect, then launch Valorant.
Fix 13. Reinstall Riot Vanguard
If Vanguard’s core files are corrupted, restarting the service will not be enough—you will need a clean reinstall.
- Click the Start menu, type Add or remove programs, and press Enter.
- Search the list for Riot Vanguard.
- Click the three dots next to it, select Uninstall, and confirm.
- Restart your PC once the uninstallation finishes.
- Open the Riot Client and click Update or Play on Valorant—the client will automatically download and reinstall a fresh copy of Riot Vanguard.
- Restart your PC one final time when prompted, then launch the game.
Fix 14. Submit a Ticket to Riot Player Support
If you have tried every step above and still see VAL 7, the issue is likely tied to your specific account or regional routing.
- Visit the VALORANT Support Portal.
- Click Submit a Ticket at the bottom of the page.
- Include Error Code VAL 7, your Riot ID, and a brief list of the troubleshooting steps you have already completed so an agent can inspect your account logs.
Final Thoughts
In most cases, syncing your Windows clock and region automatically or restarting the Riot Vanguard service (vgc) will immediately clear Valorant Error Code VAL 7. If the error persists after working through the network and firewall steps above, check your email for any account notices or reach out directly to Riot Player Support for account-level assistance.
Frequently Asked Questions (FAQ)
1. What causes Valorant Error Code VAL 7?
Error Code VAL 7 means the Riot Client could not connect to the session service. It is most commonly caused by an out-of-sync Windows clock or region setting, a blocked Riot Vanguard (vgc) service, ISP routing issues, or an active account suspension.
2. Does reinstalling Valorant fix Error Code VAL 7?
You rarely need to reinstall the entire game. In almost all cases, syncing your Windows time automatically, using Cloudflare WARP, or reinstalling only Riot Vanguard (which takes less than two minutes) solves the problem without redownloading Valorant.
3. Can a VPN cause or fix Error Code VAL 7?
Both. Standard third-party VPN servers are sometimes blocked by Riot’s authentication servers and can trigger VAL 7. However, if your local ISP is blocking Riot’s servers, connecting through Cloudflare WARP (1.1.1.1) or a clean gaming VPN route can bypass the ISP block and fix the error.
Further Reading
- How to Fix Valorant EpicWebHelper.exe Error 0xc0000005 (Unable to Start Correctly)
- How to Fix League of Legends Error 0xc0000005 (Unable to Start Correctly)

Danny Paul is a tech specialist and avid gamer with over 10+ years of experience resolving complex system errors, software bugs, and platform glitches. He specializes in creating straightforward, actionable troubleshooting guides for Android, iOS, PC gaming, and mainstream social media networks to help users fix issues instantly. In his free time, he loves solving puzzles, playing online games, watching movies, and traveling.