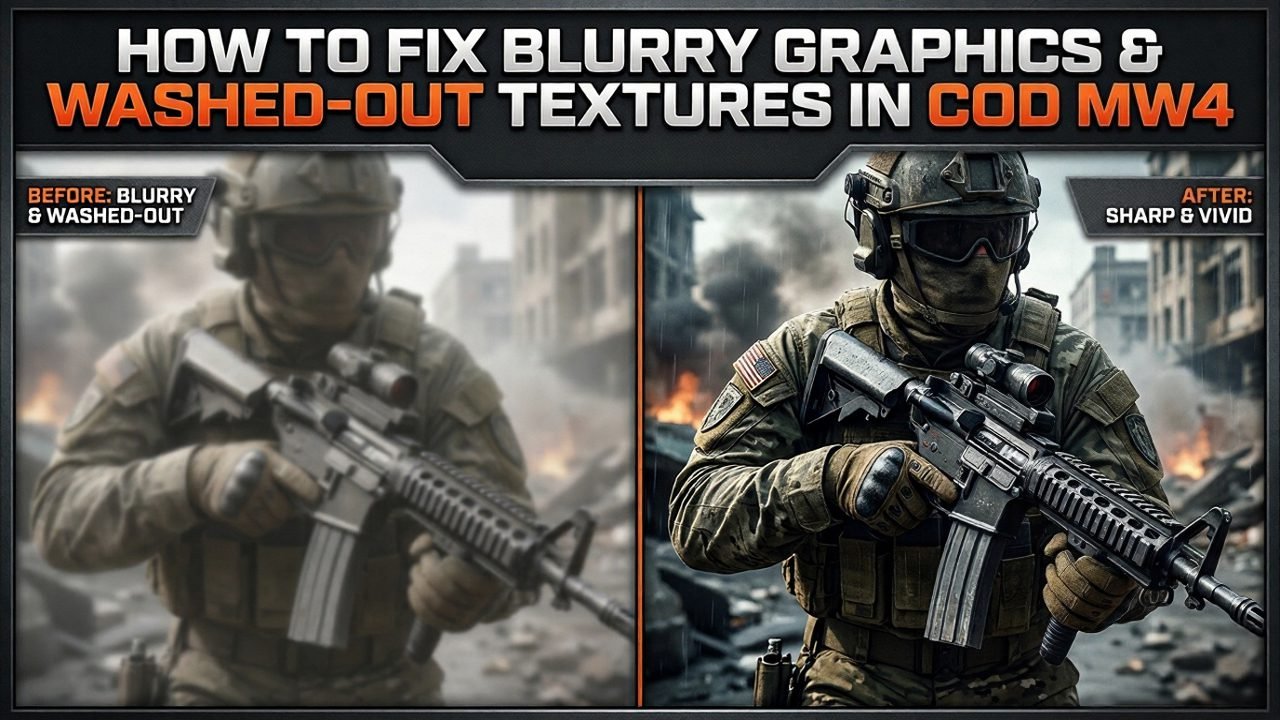
Few things ruin a high-stakes match faster than struggling to spot an enemy because your screen looks like a smeared, blocky mess. If you are currently dealing with distracting Graphics or Texture Issues, you know exactly how frustrating it is. You boot up the game expecting stunning visuals, but instead, you are greeted by frustratingly Washed-out Graphics or heavily Pixelated Graphics on PC.
It turns out you are not the only one dealing with this problem. Thousands of players are reporting the exact same visual bugs after recent updates. Fortunately, you do not have to just live with a bad display. In this comprehensive guide, we will show you exactly how to fix Modern Warfare 4 blurry & grainy graphics using proven, step-by-step tweaks. Let’s dive in and finally get your game looking crisp, clear, and running exactly the way your hardware intended.
What Causes Texture Corruption and Graphical Blur in Modern Warfare 4?
Before diving into the solutions, it helps to understand why your game looks like a muddy, pixelated mess in the first place. More often than not, these visual bugs are triggered by an unoptimized shader cache or conflicts with recent GPU driver updates.
When a game patch drops, old cache files can get corrupted, forcing the engine to loop indefinitely and display flat placeholder textures.
Additionally, the game’s aggressive on-demand texture streaming settings can severely bottleneck your hardware if your internet connection dips or if the files are forced to load from a traditional hard drive instead of a fast solid-state drive.
By targeting these specific system conflicts, you can easily clear up the visual haze and restore crystal-clear graphics.
How to Fix Modern Warfare 4 Graphics and Texture Issues on PC
Fixing these frustrating visual glitches doesn’t require you to be a tech wizard or buy expensive hardware updates. Most of these bugs can be resolved by simply forcing the game engine to refresh its internal cache, tweaking a few misaligned in-game settings, or cleaning out bad display drivers.
To get the best results, we highly recommend following this list sequentially, starting with the quickest in-game toggles before moving on to the advanced system-level cleanups.
Fix 1: Restart Shader Preloading (The Quick Reset)
Whenever Call of Duty updates, the shader files can easily glitch out, causing textures to look like flat, muddy clay. Forcing the game to reload these files from scratch is the fastest way to fix the issue.
- Launch the game and go to Graphics Settings.
- Under the Display tab, locate the option labeled Restart Shader Preloading and click it.
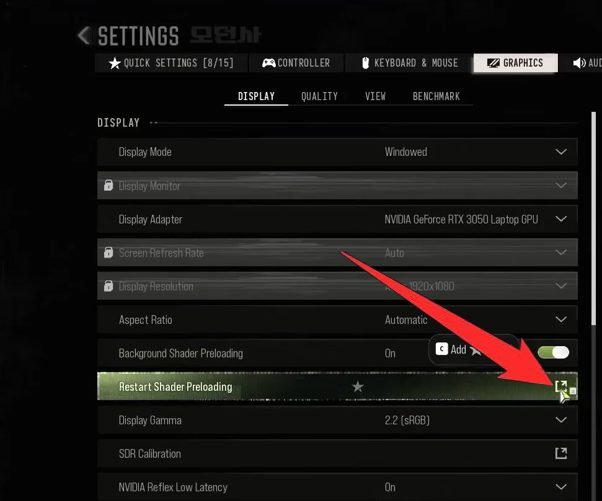
- Crucial Step: Restart your game client. Once you are back on the main menu, sit completely still and let the progress bar at the top left hit 100% complete.
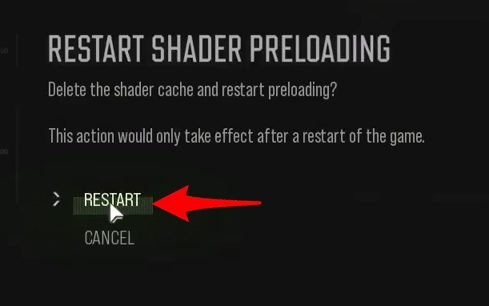
- After restarting, launch the campaign and Quit Campaign. Then join multiplayer and check.
Fix 2: The Campaign-to-Multiplayer Mode Switch Workaround
If your multiplayer maps are still loading textures slowly, creators have discovered a clever sequencing workaround that tricks the game engine into loading high-res textures.
- Complete Fix 1 to restart your shader preloading.
- Instead of jumping straight into a multiplayer lobby, launch the single-player Campaign mode first.
- Let the campaign map render fully, stay in the game for a short period, and then quit the campaign.
- Immediately jump into Multiplayer matchmaking. The game will carry over the correctly initialized asset paths from the campaign.
Fix 3: Perform a Clean GPU Driver Rollback
If your graphics issues started suddenly after updating your graphics card, a buggy display driver is the primary suspect. Community reports show that recent updates introduced severe texture-smearing bugs on high-end NVIDIA RTX cards, as well as certain AMD systems.
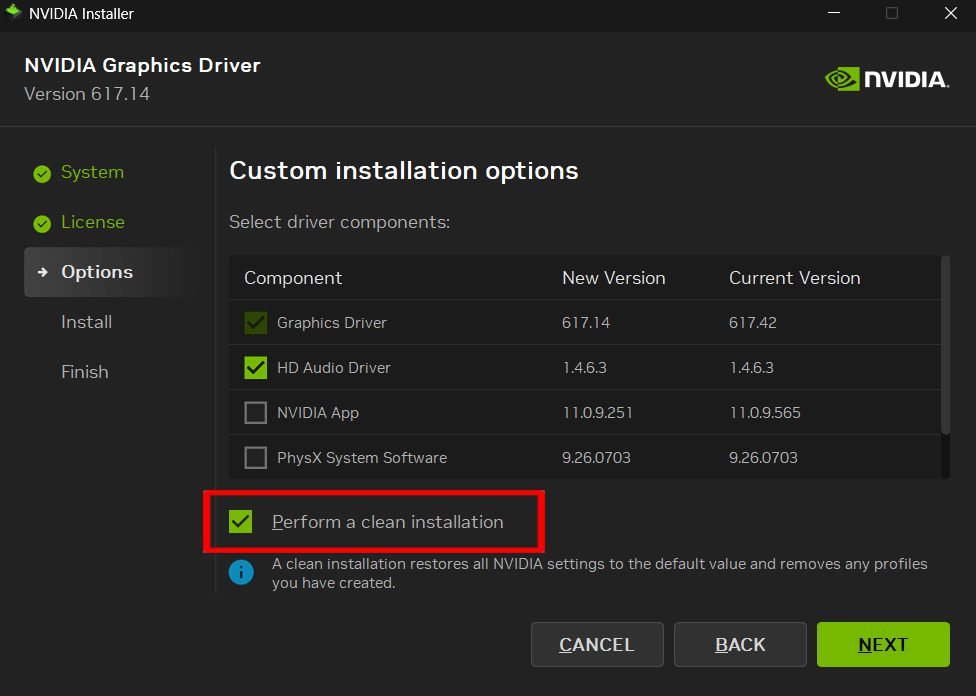
- NVIDIA Users: Download a proven, stable release like 617.42 or 617.14 directly from the Official NVIDIA Driver Downloads Portal.
- AMD Users: Revert your graphics software to a previous stable release via the Official AMD Drivers and Support Portal.
- The Clean Install Trick: When running the downloaded setup file, choose Custom Installation and explicitly check the box that says “Perform a clean installation”. This ensures the bugged driver files are entirely wiped out. Make sure to restart your PC as soon as it finishes.
Fix 4: Lock the Render Resolution Back to 100%
Modern Warfare 4 frequently resets your internal Render Resolution down to 50% or 75% after minor game patches. This aggressively downscales your game, making everything look like a blurry, pixelated, low-res mess.
- Navigate to Graphics Settings > Display.
- Locate Render Resolution and make sure the slider is set exactly to 100%.
Fix 5: Disable Post-Processing Blur Filters & Film Grain
The game ships with several cinematic filters enabled by default that add massive amounts of visual noise and smear to your gameplay.
- Head to your in-game Graphics Settings and turn the following features Off:
- World Motion Blur → Off
- Weapon Motion Blur → Off
- Depth of Field → Off
- Locate the Film Grain slider and pull it all the way down to 0.00 to eliminate pixelated screen static.
Fix 6: Force Turn Off DirectX Ray Tracing
While ray tracing creates beautiful lighting and reflections, the ray-tracing engine in MW4 is notorious for causing severe asset-streaming glitches. Leaving this feature enabled often tricks the game into rendering flat, clay-like textures on environments and weapons.
- Go to the Graphics Settings menu and select the Quality tab.
- Find DirectX Ray Tracing and toggle it completely Off. This instantly restores standard high-quality texture rendering and gives you a noticeable frame-rate boost.
Fix 7: Deep Purge Your Hidden Windows DXCache Folder
Often, the game client claims it is rebuilding your shaders, but it loops infinitely because it keeps pulling corrupted data remnants hidden away in your Windows system folders. Wiping this cache forces a true, fresh start.
- Completely close Call of Duty: Modern Warfare 4.
- Press the Windows Key + R on your keyboard to open the Run dialog box.
- Type %localappdata% into the field and hit Enter.
- Open the NVIDIA folder (or your AMD system equivalent).
- Double-click the folder labeled DXCache and delete every single file inside it. (If Windows tells you a file is currently in use, simply hit “Skip” for that specific file).
Fix 8: Manually Delete the Game’s Root Shader Folder
Once your Windows cache is clean, you need to wipe the local shader cache inside the game directory itself so the engine can download fresh files without conflicting data.
- Open your primary game installation folder (usually located under Steam/steamapps/common/… or your Battle.net game path).
- Open the directory folder named sp26.
- Find the folder named shadercache and delete it entirely.
Note: After doing Fix 7 and Fix 8, make sure to repeat Fix 1 to let the game compile everything perfectly.
Fix 9: Fine-Tune On-Demand Texture Streaming
Modern Warfare 4 features an interactive asset-streaming mechanic that pulls high-resolution textures straight from Activision’s live servers while you run across the map. If your internet connection or the server dips, the textures look muddy.
- Go to Graphics Settings > Quality > On-Demand Texture Streaming.
- If you have high-speed, reliable internet, set this to Optimized.
- If your internet suffers from packet loss, instability, or strict data caps, turn this setting completely Off. This forces the game engine to fall back on your local hardware assets, removing server latency out of your image quality equations.
Fix 10: Tweak Upscaling Settings & Use FidelityFX CAS
Using upscaling tools like DLSS, FSR, or XeSS on “Performance” modes can make 1080p and 1440p displays look incredibly grainy.
- If your graphics card can handle it, turn Upscaling Off completely to run at native resolution.
- If you need the extra performance boost, change the preset profile layout from Performance to Quality mode.
- For the sharpest visual look, switch your Upscaling method entirely to FidelityFX CAS and set the sharpening index slider anywhere between 60 and 80.
Fix 11: Switch Your Accessibility High-Contrast Filter
If your game resolution is fine but the game environment looks dull, greyish, and hazy, you can use the game’s built-in accessibility filters to make the colors pop.
- Navigate to Interface Settings > Readability > Color Customization.
- Switch the active Color Filter option to Filter 2.
- Set the target profile adjustment to Both.
- Crank both the World Intensity and Interface Intensity sliders all the way up to 100. This removes the washed-out film over the screen and makes enemies much easier to spot.
Fix 12: Verify and Repair Your Platform Game Files
If nothing else has worked, some of the high-resolution texture maps may have been corrupted or improperly downloaded during a game update. Your game launcher can easily scan and fix them.
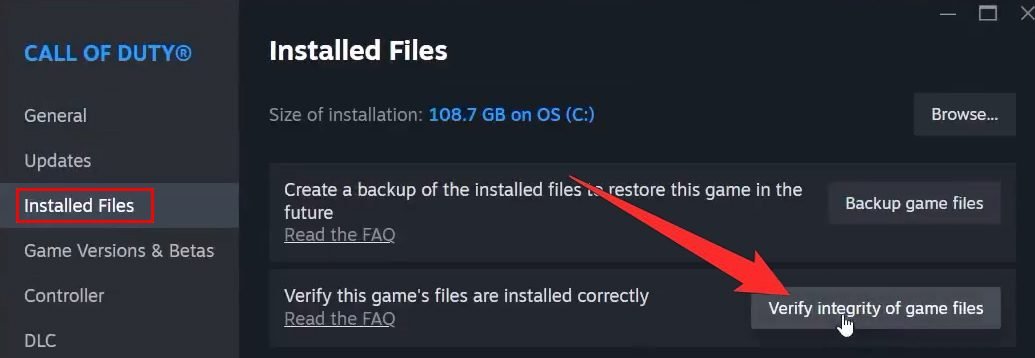
- For Steam Users: Open your Library, right-click COD MW4, and click Properties. Go to the Installed Files tab and click Verify integrity of game files.
- For Battle.net Users: Go to the game page, click the Gear Icon next to the blue Play button, select Scan and Repair, and then click Begin Scan.
Fix 13: Migrate the Game Installation to an SSD
If you have applied all the settings fixes and your game still takes minutes to load textures properly during a match, your hardware storage drive is likely the bottleneck. Modern warfare titles move immense amounts of texture data on the fly.
Running the game on an older Mechanical Hard Disk Drive (HDD) will cause late texture pop-ins. Moving your entire game installation directory over to a fast Solid-State Drive (SSD) is essential to fix asset delivery delays.
Conclusion: Enjoy Crisp Visuals in Modern Warfare 4
Dealing with blurry textures and washed-out colors can turn a competitive match into an absolute headache. Thankfully, you do not have to settle for subpar graphics. By systematically working your way through these fixes – starting with quick in-game settings resets like checking your Render Resolution and moving up to deep cache flushes – you can easily force the game to render the crisp, clear environment your PC hardware was built to deliver.
Keep this guide bookmarked for future game updates, as large patches are notorious for resetting player configurations. Now, boot up your game, jump into the lobby, and enjoy the clean views!
Frequently Asked Questions (FAQs)
1. Why does my game look blurry even though my graphics settings are set to High?
This is usually caused by the game automatically lowering your Render Resolution slider to 50% or 75% behind the scenes, a common bug that occurs after minor patches. It can also happen if your On-Demand Texture Streaming is struggling to download asset packages quickly enough due to server congestion or an unstable internet connection.
2. Will rolling back my GPU driver affect my performance in other PC games?
Forcing a driver rollback to a highly stable, older version (like NVIDIA 617.42) is perfectly safe and won’t hurt your performance in older games. In fact, because recent driver packages have caused heavy optimization issues across several titles, stepping back to a proven, stable release will often make your entire PC library run smoother and with fewer crashes.
3. What is the difference between clearing the in-game shader cache and the Windows DXCache folder?
The in-game setting (Restart Shader Preloading) simply asks the game to rewrite its basic visual files. However, if those files are severely corrupted, the game engine will keep pulling broken data remnants from your hidden Windows directory. Manually purging the DXCache folder in your %localappdata% directory completely obliterates those hidden files, forcing your graphics card to build a genuinely flawless, brand-new visual profile from scratch.
4. Can I run Call of Duty: Modern Warfare 4 on a mechanical Hard Disk Drive (HDD)?
While the game will technically launch from an HDD, you will constantly experience late texture pop-ins, muddy surfaces, and long loading screen freezes. Modern gaming titles move immense amounts of graphical data on the fly. Upgrading to a fast Solid-State Drive (SSD) is practically essential to keep up with the asset streaming demands of the game engine.
5. Does turning off DirectX Ray Tracing significantly lower the visual quality of the game?
Not at all. In a fast-paced multiplayer title like Modern Warfare 4, you will barely notice the difference in lighting, shadows, or reflections during active combat. Turning it off not only fixes severe texture corruption loops, but it also gives you a massive boost in frames per second (FPS) and removes heavy input lag.
6. Why do my colors look greyish and washed out even when my monitor brightness is fine?
If your screen looks like it has a hazy, grey film over it, your game is likely mismatching display profiles. Go to your settings and check that your Display Gamma is explicitly set to 2.2 (sRGB) instead of 2.4 (BT.1886). You can also apply the Accessibility Filter 2 trick under Color Customization to instantly force the environment colors to pop and look vivid.
7. Is it safe to delete the entire contents of the DXCache folder?
Yes, it is entirely safe. The files inside the DXCache folder are simply temporary instructions compiled by your graphics card to help games load graphics faster. If you delete them, Windows will naturally and automatically recreate clean, uncorrupted files the next time you launch your games. Just make sure to skip any individual files that Windows says are currently in use.
8. Why does my game look grainy even though I turned off Film Grain?
If your screen still has a noisy, pixelated static look after dropping Film Grain to 0.00, your Upscaling method is the culprit. Using technologies like DLSS, AMD FSR, or Intel XeSS on “Performance” modes heavily compresses the image at 1080p. Switch your upscaling preset profile to Quality, or use FidelityFX CAS with a sharpness slider setting between 60 and 80 for a crystal-clear look.
9. How do I know if my internet connection is causing the blurry textures?
If your local game hardware settings are fine but objects look blurry when you move into new areas of a map, check your On-Demand Texture Streaming toggle. Turn it off completely. If the blur instantly disappears and textures load normally, it means your internet connection is experiencing packet loss or bandwidth limits that are preventing Activision’s servers from sending high-res data fast enough.
More COD MW4 Troubleshooting Guides:
- How To Fix MW4 Connection Error & Multiplayer Issues on PC
- How To Fix MW4 Crashing & Not Launching on PC: Ultimate Troubleshooting Guide

Danny Paul is a tech specialist and avid gamer with over 10+ years of experience resolving complex system errors, software bugs, and platform glitches. He specializes in creating straightforward, actionable troubleshooting guides for Android, iOS, PC gaming, and mainstream social media networks to help users fix issues instantly. In his free time, he loves solving puzzles, playing online games, watching movies, and traveling.