Are you stuck staring at a MW4 connection error instead of dropping into the multiplayer lobby? You aren’t alone. A massive wave of PC players are currently locked out of the game due to frustrating network errors, sudden login issues, and game-breaking server disconnects.
Whether you are dealing with a generic loading loop or staring down specific launch disruptions like Error Code HUENEME–NEGEV and LIVORNO-NAVAJO, these bugs are completely halting matchmakers. Fortunately, you don’t have to wait for an official patch. Here is your streamlined, step-by-step guide to fixing your PC network issues and getting back into the action right now.
How to Fix MW4 PC Connection & Network Errors
If your game launcher hangs indefinitely on a login screen or abruptly kicks you out with server connectivity codes, the problem is usually a breakdown between your local operating system network logs and Meta’s backend matchmaking data.
To eliminate these server handshaking issues, systematically run through these 15 proven local fixes and configurations to restore your multiplayer environment:
1. Check the Activision Server Status First
Before modifying your PC’s settings, always confirm the problem isn’t on Activision’s side. Massive launch loads frequently trigger login errors.
To check, head over to the official Activision Server Status Page or check the official Call of Duty Updates X Page. If the servers are down or experiencing “Limited” access, no local fix will work; you must wait for the developers to stabilize the platform.
2. Force Automatic Time and Region Synchronization
Modern Call of Duty installments immediately reject server connections if your internal Windows clock disagrees with the global Activision login server time.
- Go to Windows Settings > Time & Language > Date & Time.
- Toggle the switch for Set time automatically and Set time zone automatically to ON.
- Scroll down and click the Sync Now button.
- Next, navigate to Language & Region and double-check that your correct home country is selected before launching the game.
3. Switch to a Wired Ethernet Connection
Wi-Fi connections are highly susceptible to packet loss and signal interference, which frequently triggers multiplayer drops and login loops during high-traffic windows.
If your PC has an Ethernet port, unplug from Wi-Fi and connect directly to your router using a physical Ethernet cable. If you are already on Ethernet and encountering blocks, temporarily switch to Wi-Fi to force the client to establish a fresh connection profile.
4. The Mobile Hotspot Re-Authentication Trick
If your home internet routing is stuck on an authentication loop, you can bypass the menu blockade by temporarily switching your connection path.
- Step 1: Completely close the game and your launcher (Steam/Battle.net).
- Step 2: Enable the Mobile Hotspot feature on your phone.
- Step 3: Connect your PC via Wi-Fi to your phone’s hotspot and launch the game. This should bypass the network verification loop and boot you into the main multiplayer lobby.
- Step 4: Minimize the game (Alt + Tab), disconnect from the mobile hotspot, and reconnect your home internet cable or Wi-Fi.
- Step 5: Click Retry inside the game menu. The online profile will migrate seamlessly without kicking you out.
5. Clear Your Stale Routes (Power-Cycle Router & PC)
A full system power cycle flushes out dead routing paths or corrupted hardware caches pointing to dead server nodes.
Turn off your PC. Unplug the power cables from both your modem and router. Leave them entirely disconnected for at least 60 seconds. Plug the router and modem back in, wait for all status lights to turn solid green, boot up your PC, and launch the game.
Step 1: Press the Windows Key, type cmd, right-click Command Prompt, and select Run as administrator.
Step 2: Type the following five commands one by one, pressing Enter after each sequence:
ipconfig /flushdns
ipconfig /release
ipconfig /renew
netsh winsock reset
netsh int ip reset
Step 3: Close the command window and restart your PC to apply the network stack reset before launching the game.
7. Configure Google or Cloudflare Public DNS Servers
Your Internet Service Provider’s default DNS paths often struggle to resolve high-traffic server nodes during launch weeks. Forcing a stable, public configuration can directly circumvent server blocks. You can re-route your data pathways through Google Public DNS or choose Cloudflare Public DNS to force a clean connection to the global multiplayer network.
- Step 1: Open the Control Panel, navigate to Network and Internet, and select Network and Sharing Center.
- Step 2: Click your active connection, click Properties, select Internet Protocol Version 4 (TCP/IPv4), and hit Properties.
- Step 3: Choose Use the following DNS server addresses and input one of these pairs:
- Google DNS: Preferred: 8.8.8.8 | Alternate: 8.8.4.4
- Cloudflare DNS: Preferred: 1.1.1.1 | Alternate: 1.0.0.1
- Step 4: Check Validate settings upon exit, click OK, and launch the game.
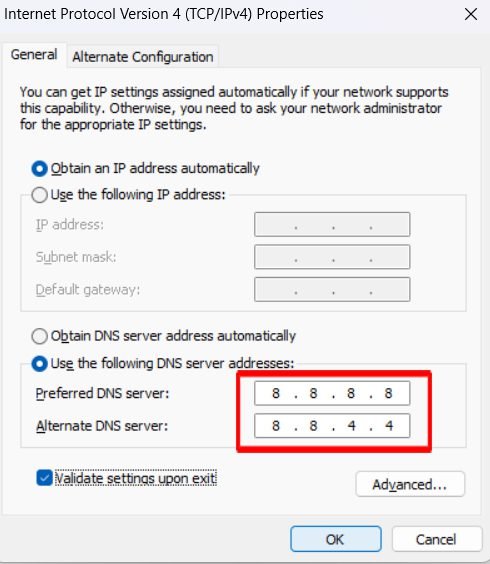
Note: If you already use a custom DNS, check Obtain DNS server address automatically to see if standard routing fixes your loop.
8. Toggle IPv6 Settings
Many online game servers still encounter severe structural routing hurdles with modern IPv6 configurations.
- Open your Network Connections panel (Windows Key + R, type ncpa.cpl, and hit Enter).
- Right-click your network adapter and select Properties.
- Scroll down and uncheck the box next to Internet Protocol Version 6 (TCP/IPv6).
- Leave IPv4 checked, click OK, and restart your PC.
(Note: You can turn this back on after your gaming session if needed).
9. Toggle VPN States to Bypass Regional Overloads
A VPN can either cause or instantly fix connection errors depending on how busy your regional internet nodes are.
- If using a VPN: Turn it off and fully close the background client application. Launcher platforms can misinterpret masked locations as security threats or malicious login attempts.
- If NOT using a VPN: Try enabling a premium VPN and routing your traffic through an adjacent region. If local server blocks or routing failures are occurring at your local ISP level, this completely avoids them.
10. Run the Game and Launcher as an Administrator
Giving your game files full administrative permissions allows the system executables to properly establish required network hooks.
- Step 1: Close Steam or Battle.net completely. Right-click your launcher icon on the desktop and choose Properties. Under the Compatibility tab, check Run this program as an administrator and hit Apply.
- Step 2: Go to your game’s installation path. Locate the main cod.exe application file (and any secondary game file sp26.cod.exe located in subfolders like sp26), right-click them, select Properties, and check Run this program as an administrator under the Compatibility tab.
11. Adjust Windows Firewall Permissions
Sometimes Windows Defender flags and blocks the specific connection protocols required for multiplayer matchmaking.
- Step 1: Open the Windows Start menu, type Windows Defender Firewall, and open it.
- Step 2: Click on Allow an app or feature through Windows Defender Firewall in the left sidebar, then click Change settings.
- Step 3: Scroll down to locate Call of Duty (or cod.exe). Ensure both the Private and Public checkboxes are selected. If the game isn’t listed, click Allow another app, browse to your installation folder, manually add both the executable files (cod.exe & sp26.cod.exe), and check both network boxes.
12. Add Executables to Windows Ransomware/Exploit Protection
Allowing the game through your firewall isn’t always enough. Controlled folder access settings can block secondary background execution files from connecting to the internet.
- Go to Windows Settings > Privacy & Security > Windows Security > Virus & threat protection.
- Click Manage ransomware protection, and ensure Allow an app through Controlled folder access is active.
- Click Add an allowed app, choose Browse all apps, and explicitly add both the main cod.exe and sp26-cod.exe (located in the subfolder sp26).
- Apply the changes to your third-party antivirus apps as well.
13. Verify the Game Installation Files & Update Windows
Missing, corrupted, or fragmented update updates from recent launch patches can trigger instant connection drops or profile loading crashes.
- Verify on Steam: Right-click the game in your library > Select Properties > Go to Installed Files > Click Verify integrity of game files.
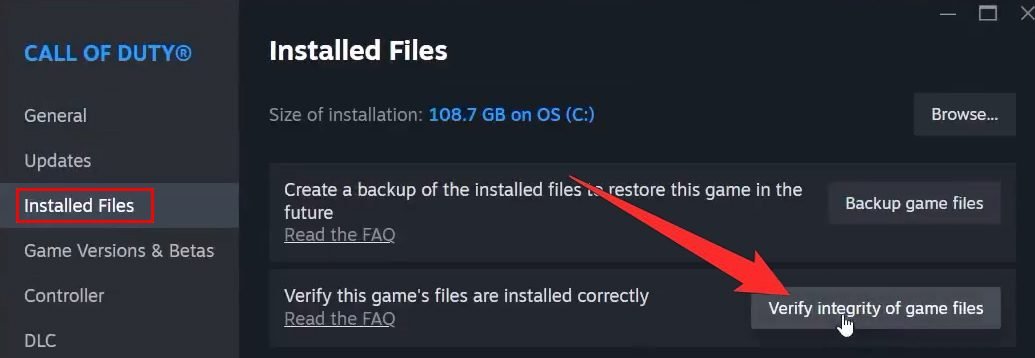
- Verify on Battle.net: Click the Gear Icon next to the Play button > Select Scan and Repair > Click Begin Scan.
- Update Windows: While the files verify, open Windows Settings > Windows Update > click Check for updates. Download any pending system framework updates and restart your PC fully before launching the game.
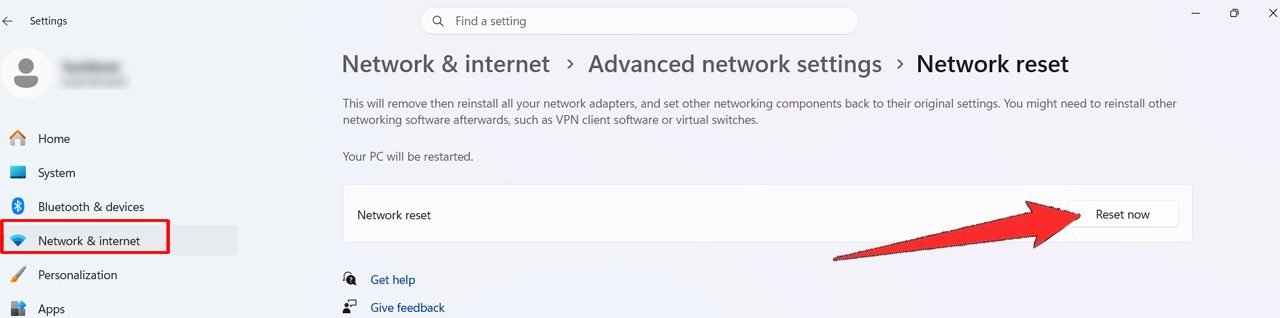
14. Run a Full Windows Network Reset
If a basic router reboot doesn’t clear your network errors, resetting your entire PC network configuration will wipe out any stale configurations or corrupted virtual adapter parameters that block multiplayer servers.
- Step 1: Press the Windows Key, type Network reset, and open the system settings option.
- Step 2: Click the Reset now button.
- Step 3: Click Yes to confirm the action.
- Step 4: Allow your computer to automatically restart to re-initialize your default network adapters.
15. Adjust UPnP and Port Forwarding Settings
A strict or moderate Network Address Translation (NAT) configuration can explicitly trigger server timeouts and authentication loops during launch loading screens.
Log into your router’s administrative dashboard via your web browser. Navigate to the advanced network tab and verify that UPnP (Universal Plug and Play) is toggled to Enabled. If your NAT type remains restricted, disable UPnP and create dedicated port forwarding rules using a static IP for your gaming desktop.
Final Thoughts: Getting Back into the Matchmaking Lobby
Dealing with sudden MW4 connection errors, frustrating login loops, or game-breaking multiplayer issues on PC can easily ruin launch week. However, systematically working your way through these 15 practical network resets and administrative fixes will usually bypass the blocks and stabilize your online profile. In the vast majority of cases, a quick command stack flush, adjusting your automatic time synchronization, or switching over to public DNS routing paths will completely fix the problem, allowing you to drop straight back into your favorite multiplayer playlists.
If you have methodically tried every single troubleshooting method on this list and you are still getting locked out by Error Code HUENEME–NEGEV or LIVORNO-NAVAJO, it is highly likely that an unexpected regional server outage or backend infrastructure lag is taking place on Activision’s end. Keep your platform applications updated, check the official status accounts for server updates, and let the developers deploy their hotfixes. We will see you on the battlefield!
MW4 Connection & Multiplayer FAQs
Why am I getting a MW4 connection error on my PC?
A connection error right after launch week is typically caused by overcrowded server nodes, corrupted temporary system cache data, or misconfigured DNS routing paths between your Internet Service Provider (ISP) and the Activision servers. Running network diagnostics or flushing your local DNS cache will usually resolve the loop.
How do I fix Error Code HUENEME–NEGEV in Modern Warfare 4?
Error Code HUENEME–NEGEV is a localized authentication block. The fastest way to fix it on PC is to temporarily connect to a mobile phone hotspot to bypass the main menu verification loop, toggle off IPv6 settings in your network adapter properties, or switch your system configuration to public Google or Cloudflare DNS addresses.
What causes the LIVORNO-NAVAJO error when connecting to online services?
The LIVORNO-NAVAJO error indicates a failure to establish a secure handshake with the multiplayer matchmaking servers. It frequently stems from an un-synchronized Windows system clock, active background VPN applications that trigger security alerts, or Windows Defender Firewall restrictions blocking the game’s executable data packets.
Why is my game stuck on a “Networking Failed to Start” login loop?
If the login menu hangs indefinitely, your game launcher might be lacking administrative privileges or a critical system service is stalled. Ensure you run your launcher (Steam/Battle.net) as an administrator and check the Windows Services panel to guarantee the internal COD Broker Service is toggled to run automatically.
Can a local router issue prevent me from loading into MW4 multiplayer?
Yes. Fragmented files, stale IP paths, or congested router caches can easily prevent your client profile from validating. Performing a full 60-second power cycle on your modem and router flushes the dead hardware paths, allowing your PC to trace a clean route to the global game lobbies.
If this guide helped you resolve your connectivity loops and get back into the game, make sure to bookmark Fixes To Follow for your future gaming fixes, and share this article with your squad to help them get back online instantly!
More COD MW4 Troubleshooting Guides:
- How to Fix Blurry Graphics & Washed-Out Textures in COD MW4
- How To Fix MW4 Crashing & Not Launching on PC: Ultimate Troubleshooting Guide

Danny Paul is a tech specialist and avid gamer with over 10+ years of experience resolving complex system errors, software bugs, and platform glitches. He specializes in creating straightforward, actionable troubleshooting guides for Android, iOS, PC gaming, and mainstream social media networks to help users fix issues instantly. In his free time, he loves solving puzzles, playing online games, watching movies, and traveling.